Tools of the Trade
Here are the basic tools -

- Full face respirator with particulate and gas filters. The
particulate part is for the hazardous dust from stuff I'm
sanding. First bottom paint, which contains copper specifically
to KILL stuff! Next, gelcoat, and finally polyurethane
paint. I started using a half face shield, but the dust was
murder on my eyes, so I sprung for a $100 full face mask from
Grainger. The gas filters are needed for spraying the
polyurethane and working with the cleaning/thinning chemicals.
- Under the mask is a tyvek suit. I got suits without a hood,
so use a T-shirt or painter's sock to protect my hair and head.
- Leather gloves, because I just have pencil pushing
calluses! Well, and because the dust will make them itch for at
least a day.
- Next is the air file, or air long board. I got a cheapo
unit from Harbor Freight. The 'board' is aluminum and almost worn
out already. When I feel like I need to replace it, I will just
make a wooden piece to bolt on. Haha, it will be nearly as light
as the aluminum and should last a lot longer.
- Below that is the Dual Action Sander. The workhorse of the
3 tools. I use stickon 60 grit paper on it. One of
the 3m papers lasts the longest. It comes in a roll.
There is a speed adjustment on the DA sander, so I can slow it down for
closer tolerance work, or run it fast to remove bulk paint or
gelcoat.
- On the bottom is my handmade long board. OK, I'm sure it's
not as nice as the $50 3m store bought version, but it was a lot
cheaper and as easy to make as anything. Again, I use stickon
paper with it. It is 2 3/4" wide and longer than I needed.
I put the middle handle off to one side as a test to see where I liked
them. It is actually long enough for two standard pieces of long
board paper. Sometimes I had 60 grit on one end and 36 grit on
the other.

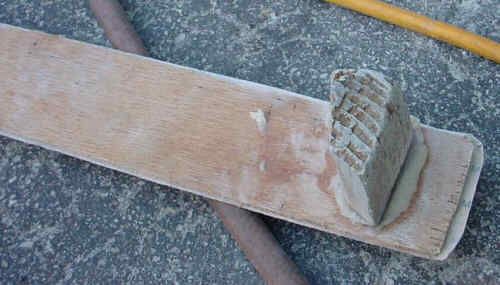
Here is the back of my homemade long board. Charlie Jones told me
how
to make it. Thanks Charlie. To make those fancy handles, I
just cut
pieces of scrap 2X4 and glued them on with epoxy thickened with
colloidal silica.

The first task was removing all the bottom paint. This was done,
first with a stripper, then with the DA Sander and 60 grit.
The DA made the blisters and other high spots stand out pretty
well. All the white and gray spots are high spots from
blisters. They came in all sizes and varieties on this
boat. The 60 grit and the DA remove material pretty quickly
and create a lot of dust. This is no time to skimp on face/eye
protection! Especially when working on your back under the
boat!
Once all the bottom paint was removed, the air file came out with 36
grit paper. This thing started taking the gelcoat off and
revealing more blisters. It took about 2 hours to do a 24"
section from one water line to the other. The 36 grit leaves deep
scratches. I think I'd use 40 grit next time.
At that point I used a Dremmel to drill about 2,000 test holes in
suspected blisters. If I found any liquid, I used a Dremmel roto
zip with a router attachment to route out the wet fiberglass. You
can see a couple of fairly large holes in this
picture. The blisters were between the mat and the
fiberglass! What a pain to get them all opened up!
This opening up blisters and sanding took nearly a month for me to do
after work, so I ended up with some good ideas of the time
lines. I rotozipped out all wet mat, so that gave me an
idea of how dry or wet the blisters were. Those blisters I did
first were normally about quarter to half dollar sized (almost all
elongated). The blisters that had been pierced by the Dremmel and
left un rotozipped for 2 weeks, had shrunk in size by about half I'd
guess. Those that had been left open 4 weeks shrunk in half
again. So you can see, that shrinking in half ever two weeks will
result in a long time before they are completely dry! Once I
rotozipped out all the wet mat, it took them about 2 weeks to
completely dry.
Once I long boarded the hull, faired everything as well as I could, it
was time to spray some high build primer. Since I am dry sailing
the boat, I choose not to put a barrier coat on. Nor am I using
bottom paint. I am curious to see how long the paint lasts
without blistering. This first layer of primer revealed
some problem areas immediately which I attended with fairing
epoxy. Then that layer got the 36 grit long board treatment to
knock off any remaining high spots. At this point, I'd estimate
about half to 2/3's of the the total gelcoat has been sanding
off. Some places I sanded considerable amounts of mat, some
places just a little gelcoat.
Next was 2 coats of high build primer and long boarding with 80 grit
paper this time. This layer revealed more pinholes in the mat and
I put some new ones in the primer itself. Sanding this layer has
taken me about 15 hours working first with the air long board, then the
hand long board to do the final sanding. A very few places will
need some fairing to complete this level. There are some places
where Catalina didn't saturate the mat with resin will. The
gelcoat masked that problem, but as the gel coat was removed, the
problem became evident. I suspect this lousy job of laying up the
mat is the major cause of the blisters, since water could easily
penetrate the mat in those places. I'd estimate 20-30% of
my mat was improperly laid up.
The 80 grit brought out a few more problems, but not many. I am
happy to say, my efforts with the 36 grit long board paid off in a fair
hull! I probably have one half of one pump worth of fairing
mixture to apply and sand.
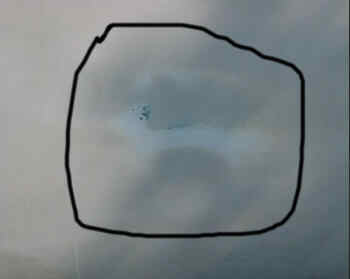
Here are a couple pictures of what a low spot looks like. Does it
remind you of a blister?

I have now worked on the hull for 95 hours. I will have put in
100 hours by the time I finish long boarding this phase with the
60-grit.
Bob
S/V The Pursuit, Catalina 22, #6195
Nashville, TN


